How to set up a printer for your iPad
Choosing a printer and printing a receipt on for your iPad
It's fairly easy to set up a printer to use for the Imonggo's iPad app. Just follow these steps:
A. Check your Hardware
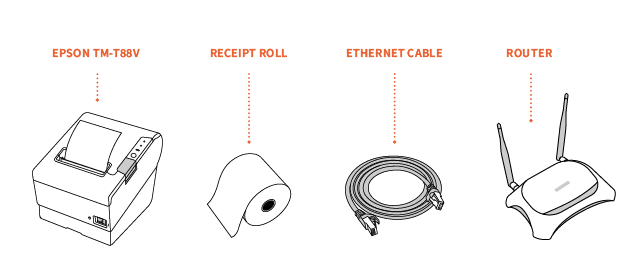
Before you start, make sure that you have the 1) printer, 2) receipt paper rolls, an 3) ethernet or LAN cable, and a 4) router
Printer
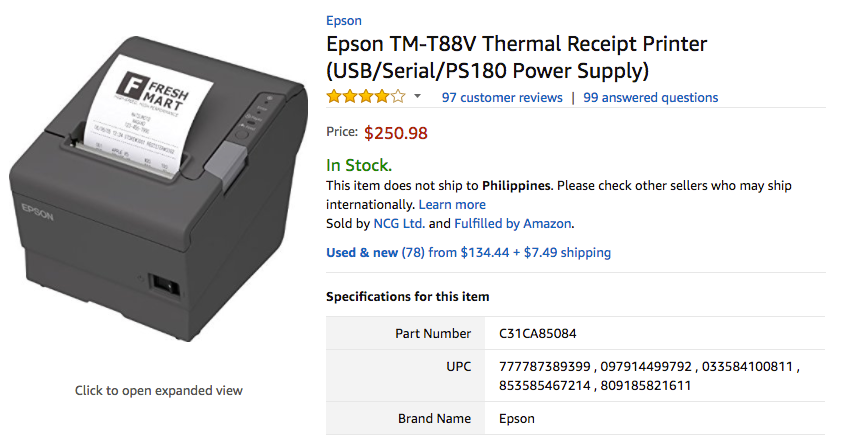
Imonggo's iPad app prints through ethernet interface, so you have to purchase ethernet-enabled POS printers. We recommend the EPSON TM-T88V, which you can purchase on Amazon.
Other recommended printers include the following EPSON printers: TM-T70, TM-U220, TM-P60, TM-T82, TM-P80 and TM-P60. Have a printer that's not on the list? Send us a message and we'll tell you if it is supported.
B. Instructions
You may ask your technician to set this up for you if one is available. If you plan to do this on your own, don’t worry--we’ve prepared clear, step-by-step instructions for you to follow.
Newly-bought Epson printers will not automatically be able to connect to your network. You’ll need to properly set it up by changing the network settings through the Dynamic Host Configuration Protocol (DHCP).
Note: To set up the DHCP, you will need to connect your iPad to your Mac or Windows computer. You won’t be able to do this on your iPad as a connection between your computer and printer is necessary.
a. Setting up the Dynamic Host Configuration Protocol (DHCP)
Step 1: You first have to know your router’s IP Address.
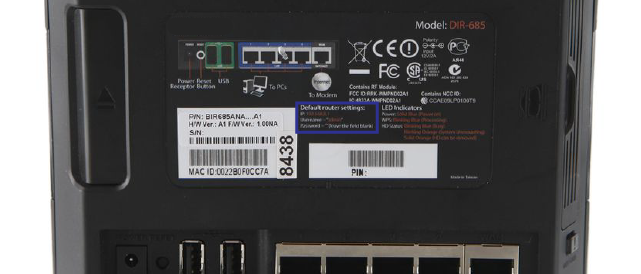
You can find this at the back or at the bottom of your router. If it is unavailable there, please refer to the box that came with your router, or call your local service provider. You may also click on this guide.
If you have already customized your router’s IP, use that instead. For this tutorial, we're using a customized IP address on our router (but don't worry, there's no difference).
Step 2: Get your printer's IP address
a. Connect your printer to a power source and turn it on. b. Using a pin, press the reset button located on the back of your printer
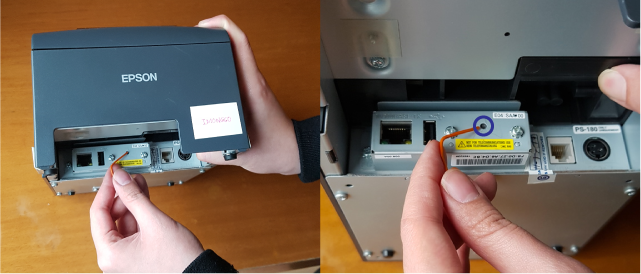
c. Your printer will print a receipt containing its network information
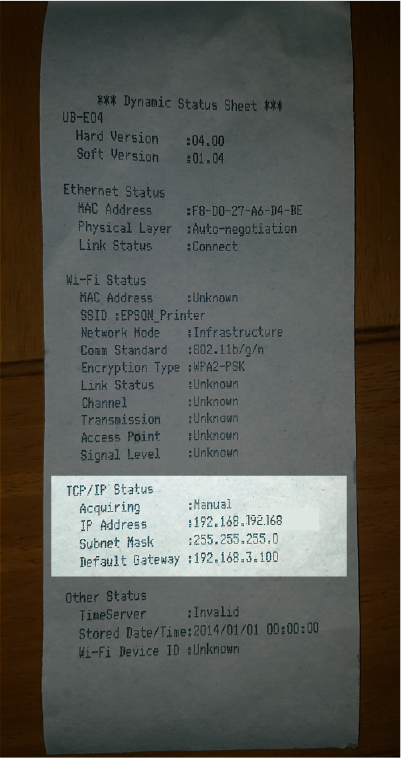
Note: the IP address may vary depending on your printer
Step 3: Connect your printer to your computer via an ethernet cable.
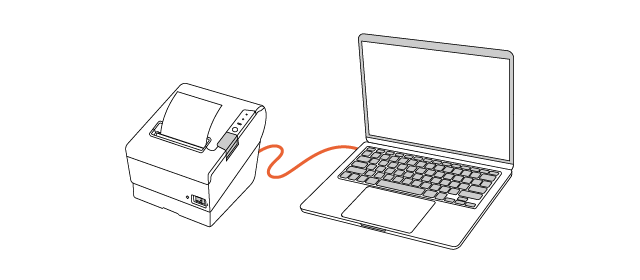
Step 4: Access your printer's configuration settings
To access your printer's configuration screen, you will need to temporarily switch your computer's IP address to that of the printer's.
IMPORTANT: Take note of your current settings as you’ll be reverting back to them after the setup is complete.
Step 1:
Go to System Preferences > Network

Step 2:
A pop-up will appear. Select 'Ethernet'
Before changing the fields, note down the original input as you'll be reverting to these after the setup.
Input the following settings:
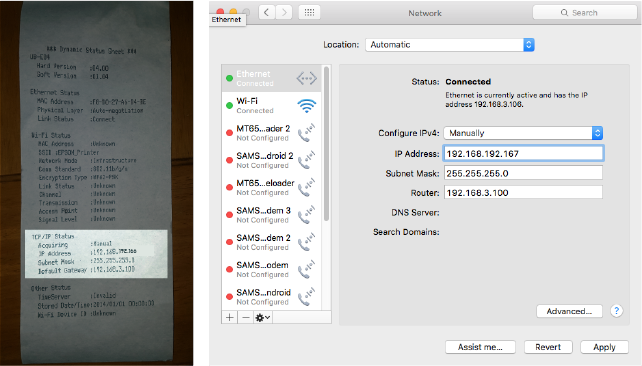
Configure IPv4: Manually
IP Address: (Enter the IP address on the printer receipt) 192.168.192.167*
Subnet Mask: 255.255.255.0
Router/Default Gateway: e.g. 192.168.3.100 (the IP address of the router)
*The last three digits should be different from the one written on the receipt. You may input any value from 1-254.
Step 3:
Enter Apply to Save.
Step 1:
Go to Start > Control Panel
Step 2:
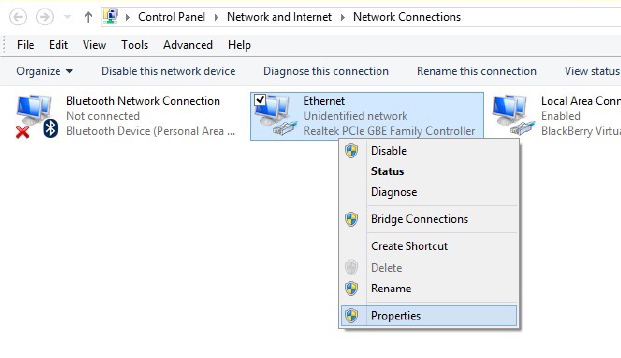
In the search box, type "adapter" and under the Network and Sharing Center click View Network Connections.

Step 3:
Right-click the connection you want and select Properties (if an administrator password or confirmation is required, enter your details)
Step 4:
Click on Internet Protocol Version 4 (TCP/IPv4) > Properties
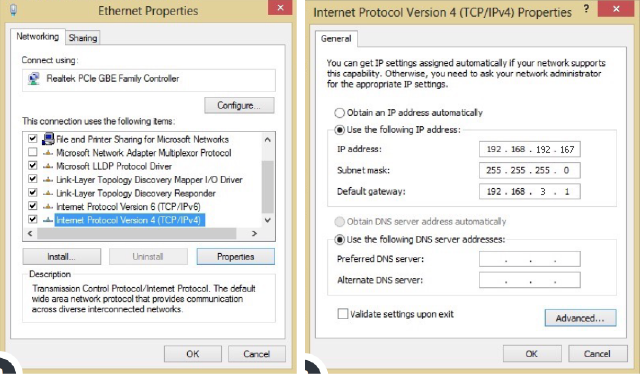
Click on 'Use the Following IP address' and enter the following settings
Configure IPv4: Manually
IP Address: (Enter the IP address on the printer receipt) 192.168.192.167*
Subnet Mask: 255.255.255.0
Router/Default Gateway: e.g. 192.168.3.100 (the IP address of the router)
Step 5:
Click OK to save changes.
Step 5: Setup your Printer
After following the steps above, you should now be able to access your printer settings through your browser.
a. Open your preferred browser (e.g. Chrome*, Firefox, Safari, etc.)
b. Refer to the receipt you had earlier. Enter the IP Address into your browser
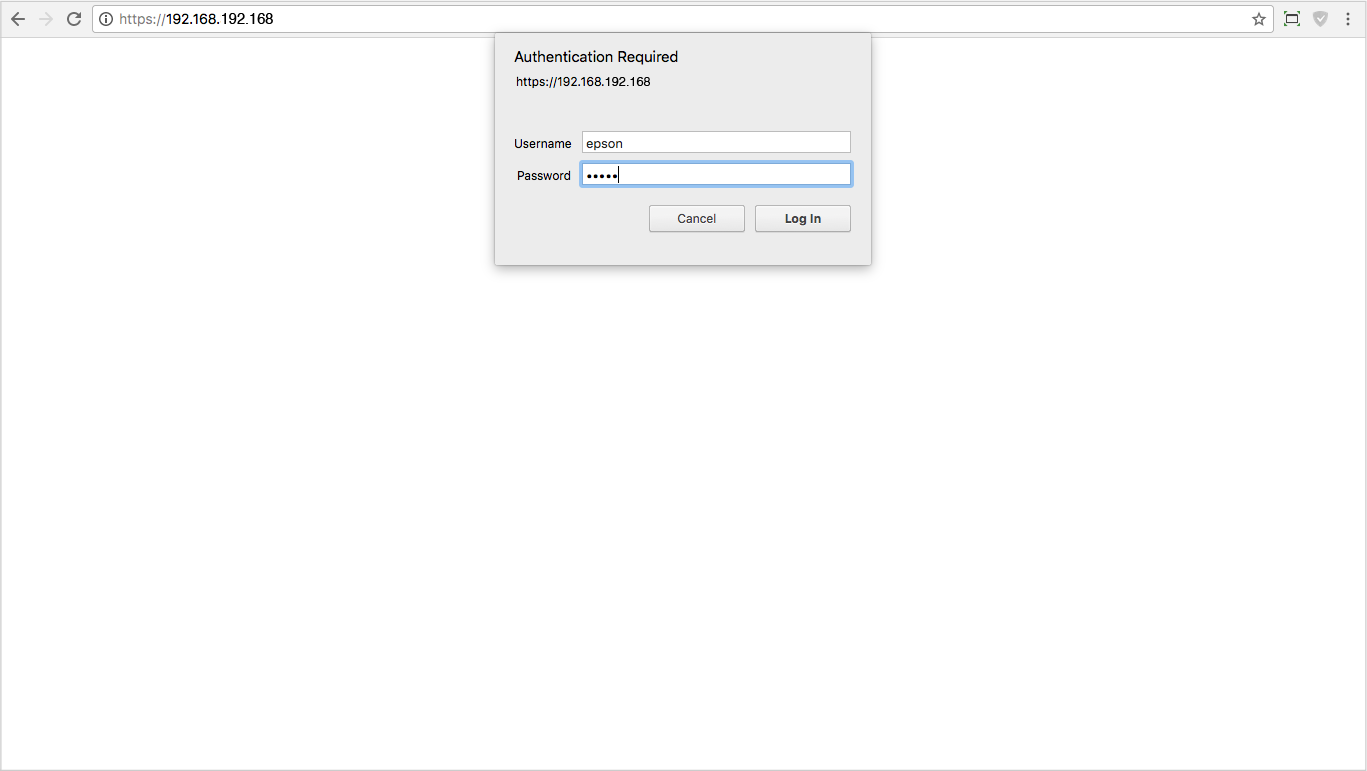
Username: epson
Password: epson
*For Chrome users: If you encounter an error screen saying "Your connection is not private", simply click on 'Advanced' and click 'Proceed to (router address)'
c. Click Log In to continue. You will be redirected to the printer's configuration screen.
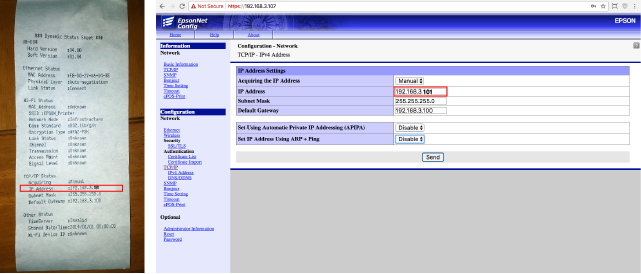
d. Navigate to TCP/IP. You should see the screen below.
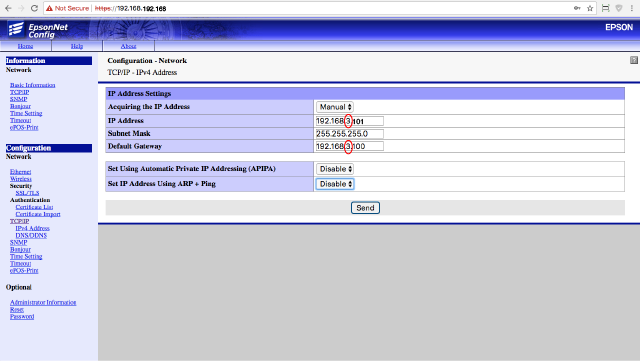
Enter the following information:
Acquiring the IP Address: Manual
IP Address (Printer): e.g. 192.168.3.101*
Subnet Mask: 255.255.255.0
Router/Default Gateway: e.g. 192.168.3.100 (the IP address of the router)
Set Using Automatic Private IP Addressing (APIPA): Disable
Set IP Address Using ARP + Ping: Disable
*Note: The fourth field in the IP Address can be any value from 1-254, except the same value as the Router/Default Gateway's fourth field. However, the value of the third field needs to exactly match the third field of the Router/Default Gateway. This will link the printer and the router together.
For example: IP Address: 192.168.3.101 Router/Default Gateway: 192.168.3.100
In this example, we changed the value of the printer IP address' last field to ".101", to indicate "Printer 1" as a personal preference. Should we add another printer in the future, we could tag the second printer as ".102" for simpler identification.
e. Click Send to save settings. You will be redirected to another screen.
f. You will be prompted to reset your printer. Click the 'Reset' button on the screen or follow the instructions as written on the screen.
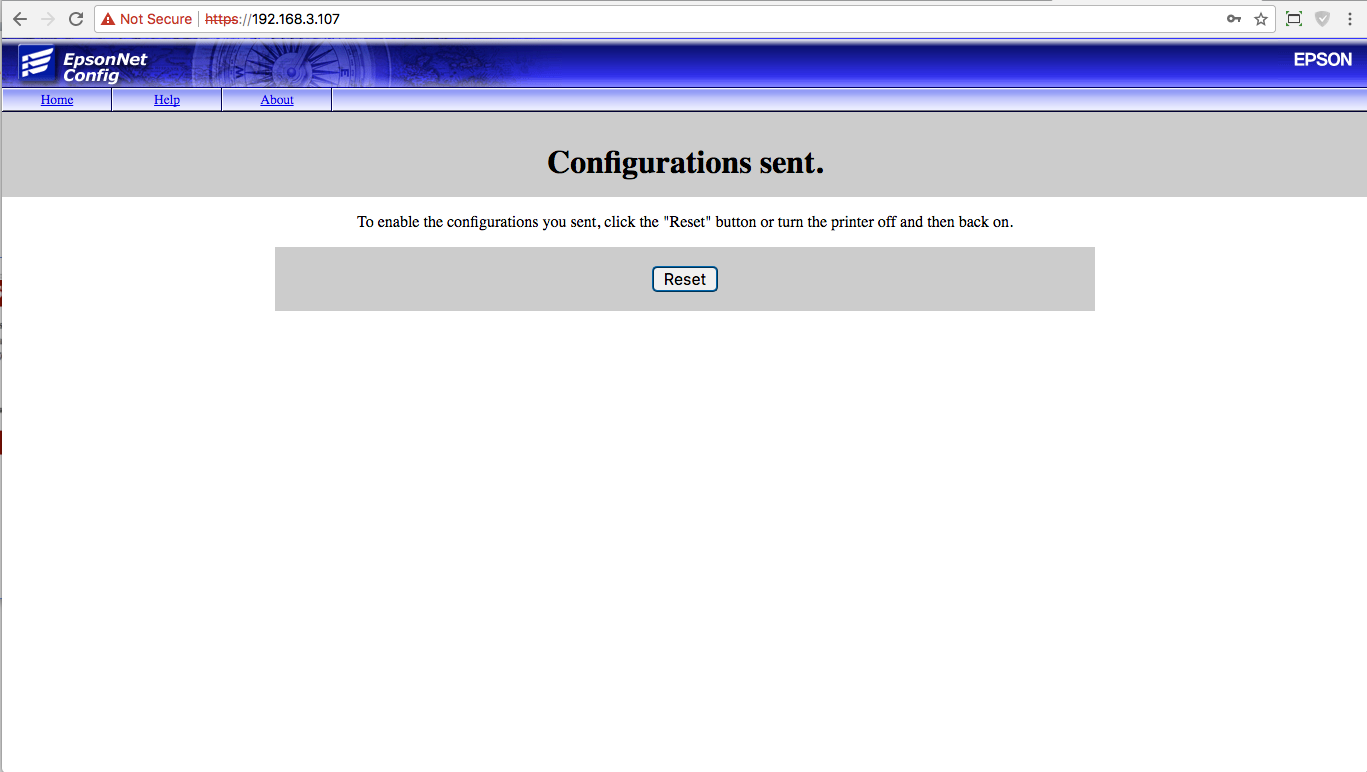
Note: It will take a while for the confirmation screen to appear after pressing the button. Please wait until the process is complete.
g. Almost done! Remember to change your computer’s IP Address back to its original settings. You may do so by following the guide for Mac or Windows above. Refer to the settings you wrote down earlier.
C. Testing the Printer
This will help you verify if your printer has been properly set up.
Step 1:
Have your printer turned on.
Step 2:
2. Hold down the 'Reset' button at the back of your printer for 3 seconds. It will print out the current network settings.
Step 3:
Check the IP Address. It should display the IP Address you previously entered in the TCP/IP fields on your browser.
Step 4:
If they don’t match, check if the printer is connected to the network. Redo Step 1. (If nothing changes, try setting up the printer once again.)
Step 5:
If the IP Addresses match (are under the same network/group), your setup has been successful.
Last updated
